 Bitácora 26
 user guide
Version 1.16 · November 2026. What each part does, what it is for, how to set it up and how to use it.
1. Install and first start
- Download Bitacora.26.zip from the home page.
- Unzip it wherever you want (for example on the Desktop). No need to install Java or anything else.
- Open the Bitacora 26 folder and double-click Bitacora 26.exe.
- If Windows warns you («Windows protected your PC»), click More info → Run anyway. It warns because the program is not signed yet.
- The first time it asks for your operator details: amateur radio and/or CB callsign, name, QTH, locator (Grid) and a password for your operator.
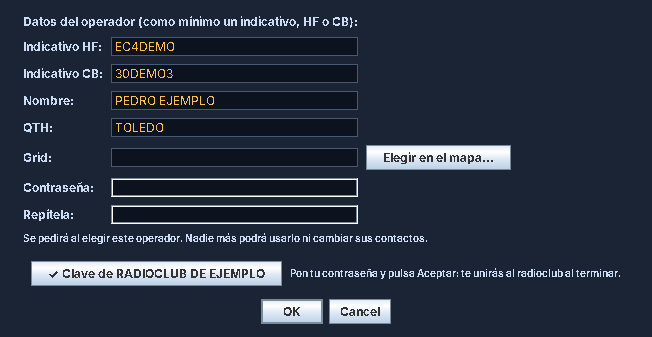
If your radio club gave you an invitation key, click Tengo clave del radioclub… (I have a radio club key), paste it and your details are filled in automatically (see Radio club).
2. The main window
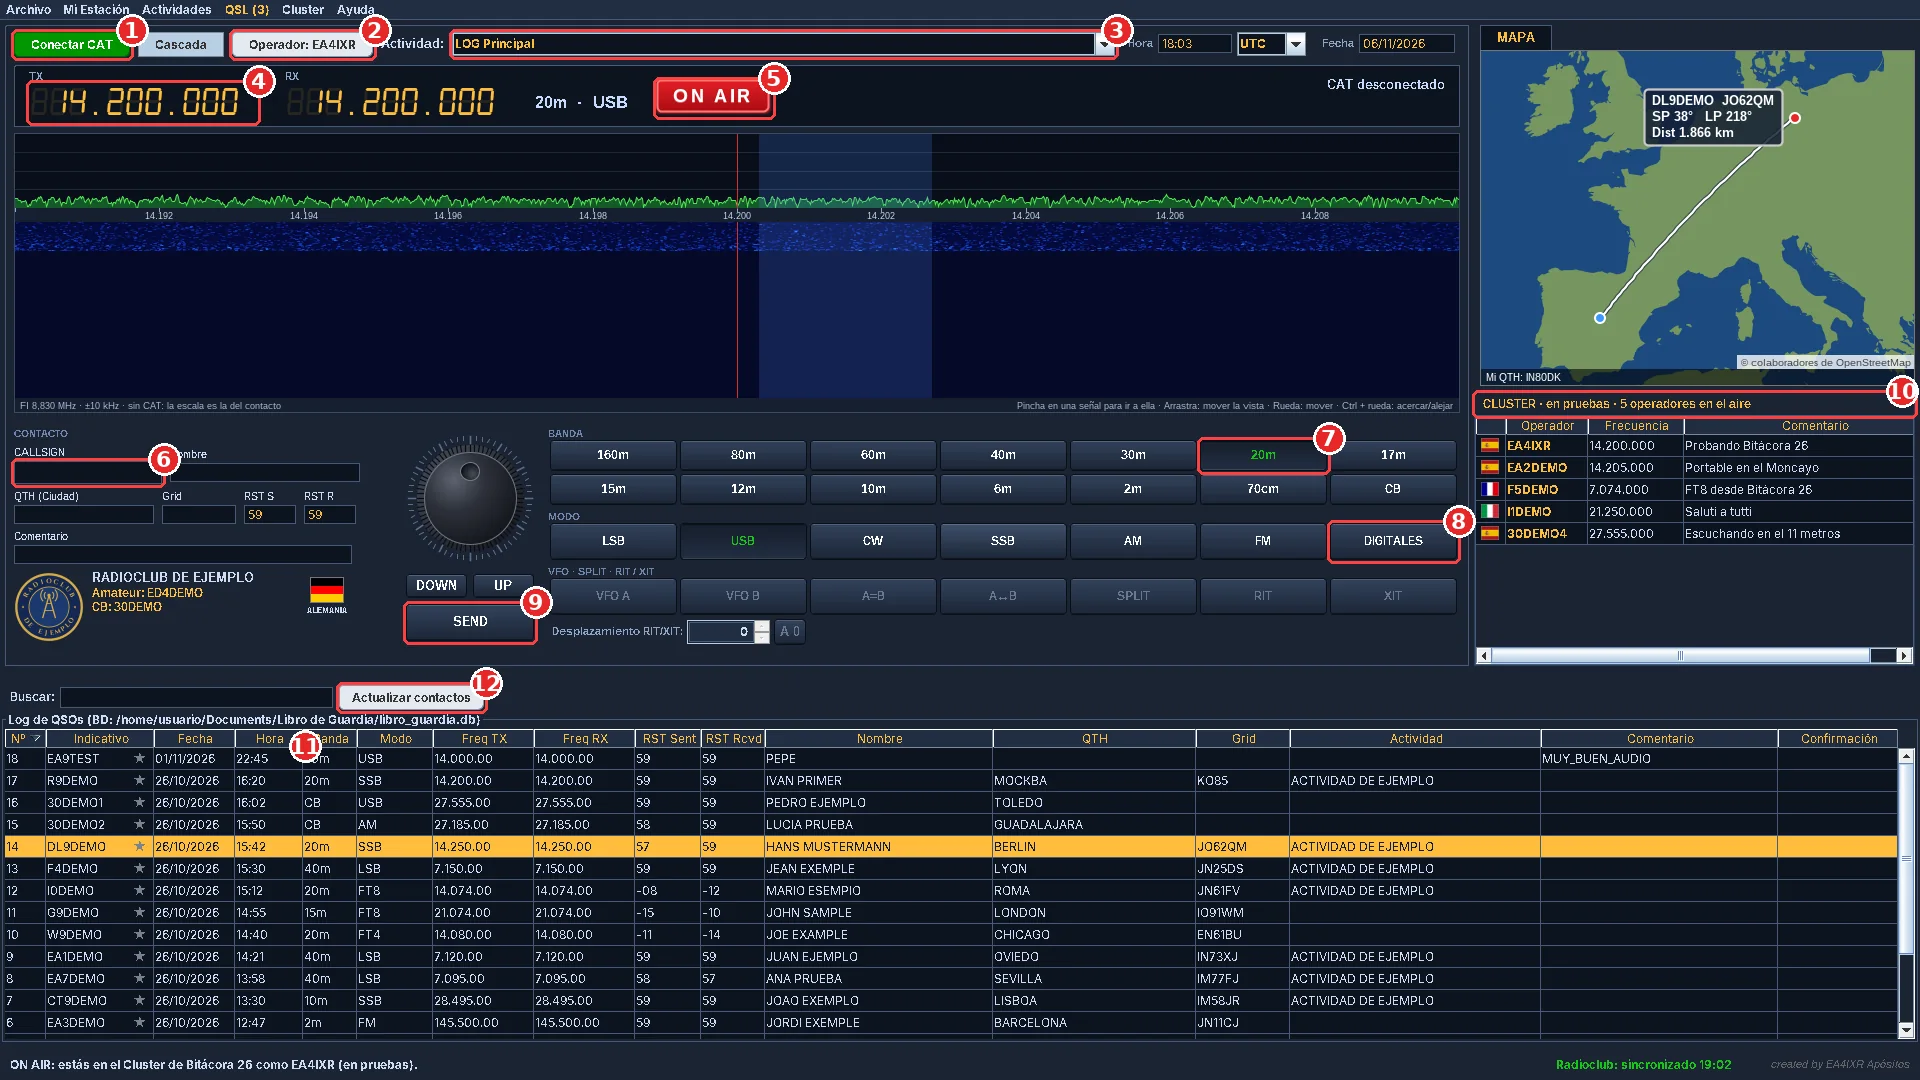
- 1Conectar CAT (Connect CAT): connects to your radio (see Connecting the radio). Next to it, Cascada (Waterfall) shows or hides it.
- 2Operador (Operator): who is logging. Click to change operator.
- 3Actividad (Activity): where contacts are saved: LOG Principal (main log), LOG Radioclub, Banda Ciudadana or an activity. To the right, the time with the UTC / LOCAL selector and the date.
- 4Display: transmit (TX) and receive (RX) frequency, band and mode.
- 5ON AIR: you appear in the Cluster so others can see you (see Cluster).
- 6Contact: type the callsign and the rest of the details here (see Logging a contact).
- 7Band and mode: buttons from 160 m to 70 cm and CB, and the modes below.
- 8DIGITALES: opens FT8 and FT4 (see DIGITALES).
- 9SEND: puts the radio in transmit while held down (needs CAT). Above it, the dial and DOWN / UP change the frequency.
- 10Cluster: who is on the air now. Above it, the map with your QTH, the other station, the bearing and the distance.
- 11Log: the contacts of whatever is selected in Actividad. Right-click one to edit, delete, upload it or send the QSL.
- 12Actualizar contactos (Update contacts): fills in missing names, QTH and locators. To the left, Buscar (Search) filters the log.
In the middle is the RTL-SDR receiver waterfall (see Waterfall), and at the very bottom the status bar, which tells you what is happening and how syncing is going.
3. The menus
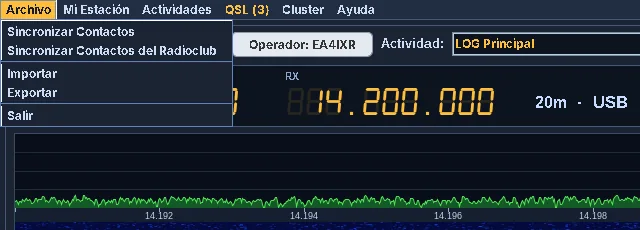
- Archivo (File): Sincronizar Contactos (sync between your computers), Sincronizar Contactos del Radioclub (sync with the radio club), Importar and Exportar (ADI files) and Salir (Exit).
- Mi Estación (My station): Operador (my details and my account), Mis emisoras (My radios), Cascada (Waterfall), Servicios online (Online services) and Radioclub.
- Actividades (Activities): Nueva Actividad (New activity) and Gestionar Actividades (Manage activities).
- QSL: Diseñar mi QSL (Design my QSL), QSL recibidas (Received QSLs) and Comprobar confirmaciones ahora (Check confirmations now). The number in brackets is new QSLs.
- Cluster: click to open the Cluster window.
- Ayuda (Help): Guía de Uso (this guide) and Información de la aplicación (About: version and Buscar actualizaciones, Check for updates).
4. Logging a contact
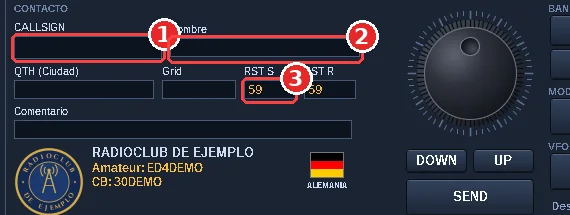
- Check that the right operator and activity are selected at the top (usually LOG Principal).
- Type the callsign in CALLSIGN. Bitácora 26 fills in the name, QTH and Grid if it finds them, in this order:
- your own contacts (on CB, first the Citizens Band list);
- that operator's Bitácora 26 details, if they have an account;
- QRZ.com and HamQTH, if you have an account (never on CB).
- Check the RST and add a comment if you like.
- Press Enter in CALLSIGN, Date or Time to save.
- Time is always stored in UTC. The UTC / LOCAL selector only changes how you see and type it. Date and time advance by themselves; if you type them by hand, they are kept.
- Text is saved in capitals and numeric fields (like RST) only accept numbers.
- With CAT connected, frequency, band and mode are taken from the radio.
- Right-click a contact in the log: edit, delete, upload to online services, send or view the QSL, move to another activity.
- Removing a contact from an activity does not delete it from the main log.
5. Connecting the radio (CAT)
So the program knows your frequency and mode, and so you can change band from the buttons.
How to set it up
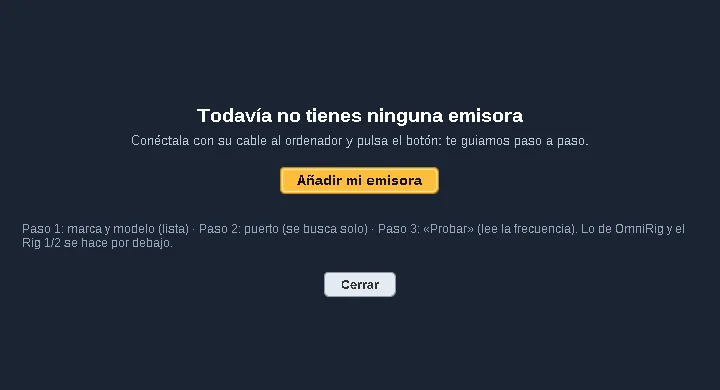
- Install OmniRig (version 2) and set up your radio and its port in it.
- In Mi Estación → Mis emisoras click Añadir mi emisora (Add my radio) or Usar esta emisora (Use this radio) and choose the OmniRig rig. Abrir OmniRig opens its settings.
- Click Conectar CAT in the main window. At the bottom you will see «CAT Conectado a OmniRig».
- Each active radio has its own tab next to MAPA: clicking it switches the program to that radio.
- The program only changes something on the radio when you ask: when you press a band, click in the Cluster, create an activity, use SEND or transmit in DIGITALES.
- WSJT-X and Bitácora 26 can use the radio at the same time if both use the same OmniRig.
6. Waterfall (RTL-SDR)
Shows the spectrum around your frequency with an RTL-SDR receiver (a cheap USB stick).
- Plug in the RTL-SDR. The program already includes rtl_tcp.exe in the rtl-sdr folder.
- In Mi Estación → Cascada (RTL-SDR) enter your radio's intermediate frequency (IF) (the RTL-SDR listens to the IF output) and, if you like, the width, speed, contrast, gain and correction (ppm). If signals move the wrong way, tick La FI sale invertida (IF is inverted).
- Click Cascada to show or hide it.
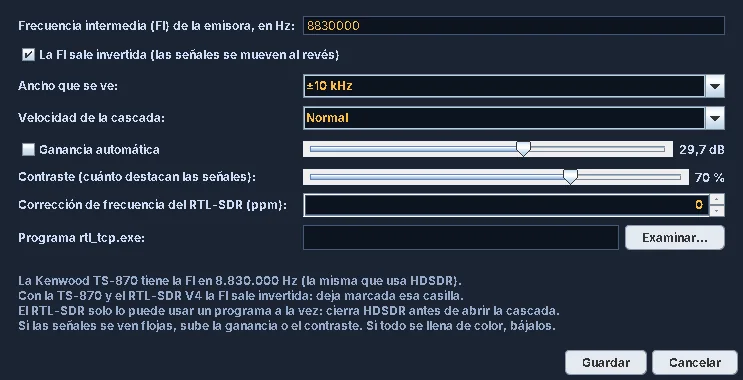
- Click a signal to go to it. Drag to move the view; scroll to move and Ctrl + scroll to zoom in or out.
- Without CAT, the scale is that of the contact you are logging.
7. Citizens Band
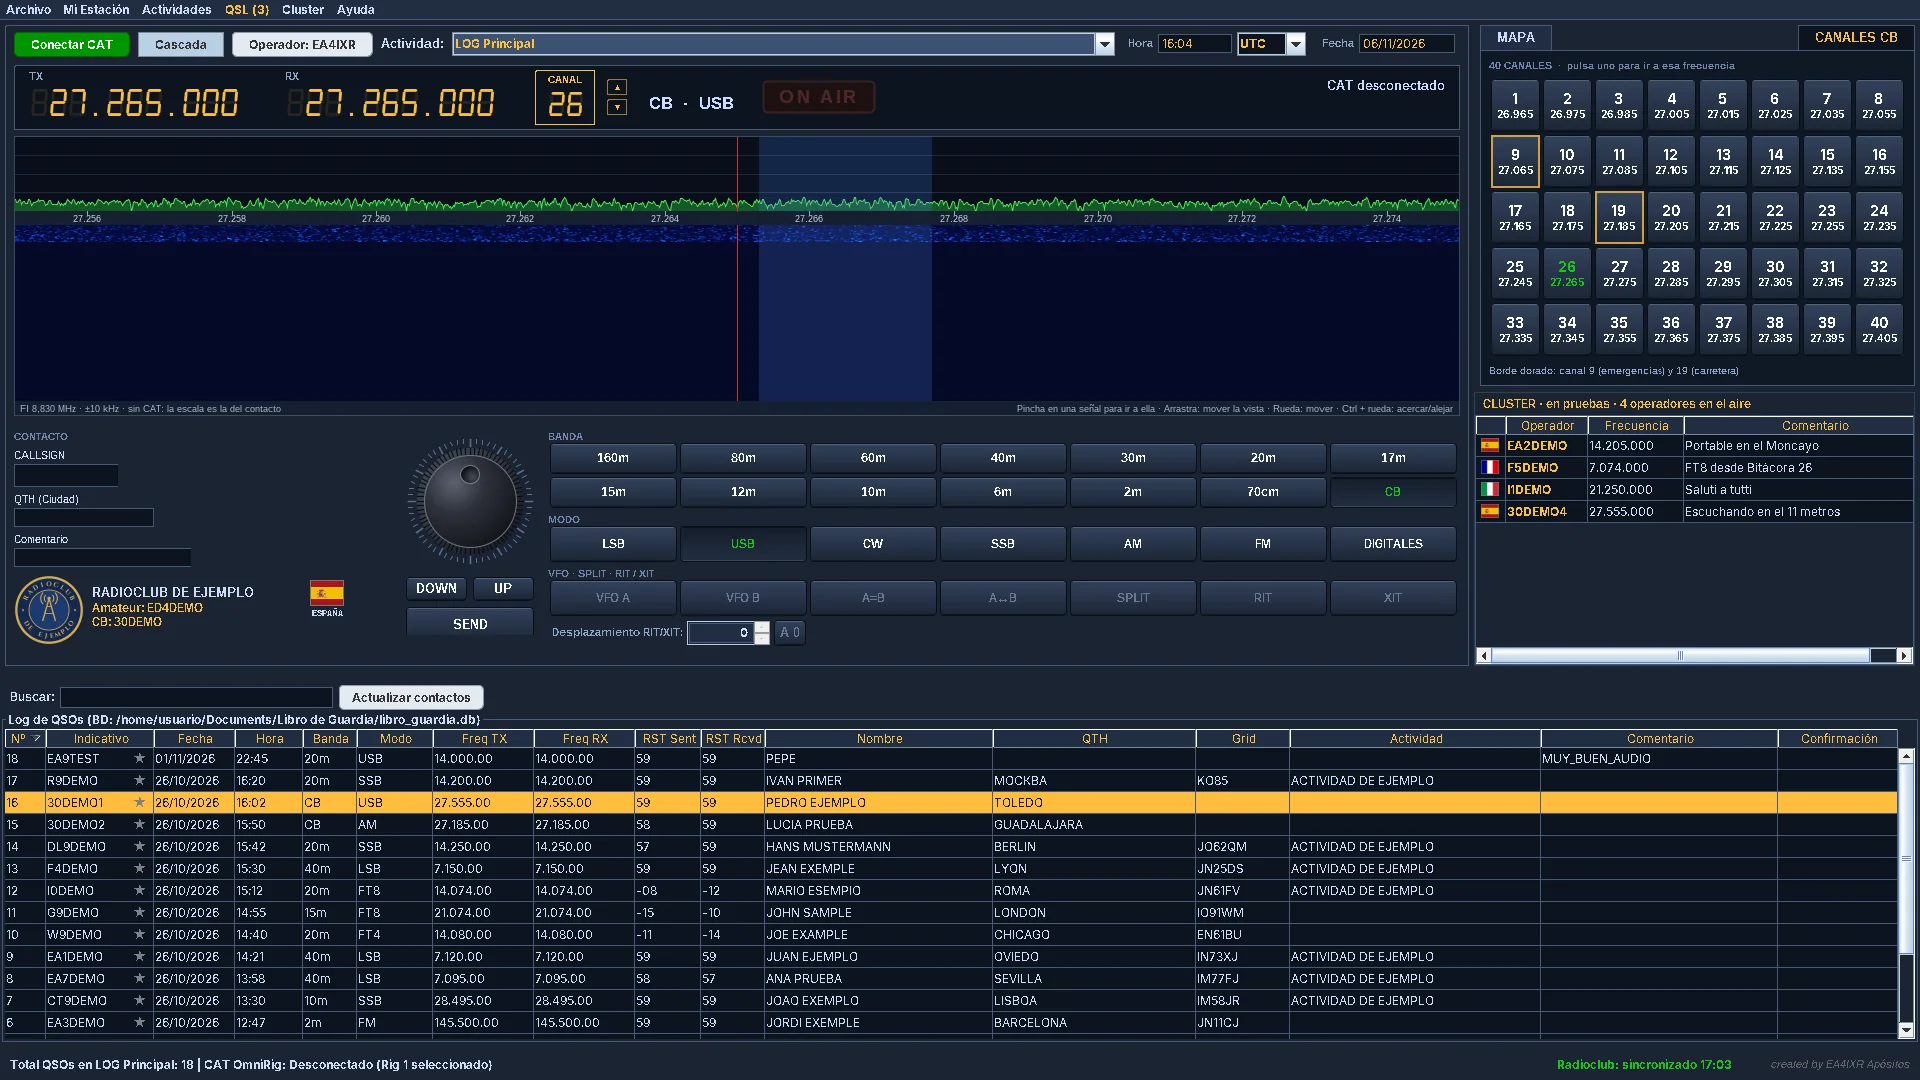
- Press the CB button: the 40 channels appear, with 9 and 19 highlighted.
- In the activity selector, BANDA CIUDADANA is the CB callsign list: an editable directory (Agregar contacto, edit and delete) that fills in the name and QTH when you type a callsign on CB.
- QRZ.com is never queried on CB. CB callsigns have no rules and can be repeated; that is why name and QTH matter.
- For now DIGITALES does not transmit on CB.
8. Activities and awards
Create an activity
- Actividades → Nueva Actividad.
- Type the Nombre (Name) and choose the Banda (Band) and Modo (Mode).
- In ¿Cómo se cuenta? (How is it counted?) choose Un contacto por estación (one contact per station) or Por puntos (by points, with its Tabla de puntos…, points table).
- If it belongs to the radio club, tick Actividad del radioclub and choose its callsign.
- Click Crear actividad. With CAT connected, the radio goes to its band and mode.
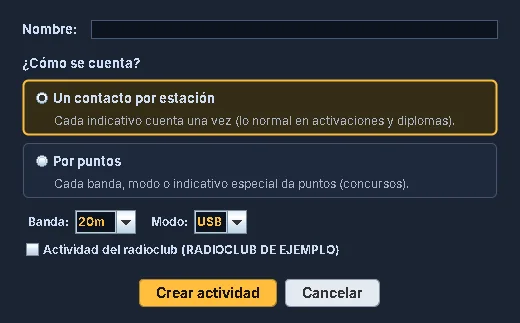
To log in it, choose it in the Actividad selector. If the radio's band or mode do not match, a red warning appears.
Manage and awards
- Actividades → Gestionar Actividades: edit and delete activities and see their contacts.
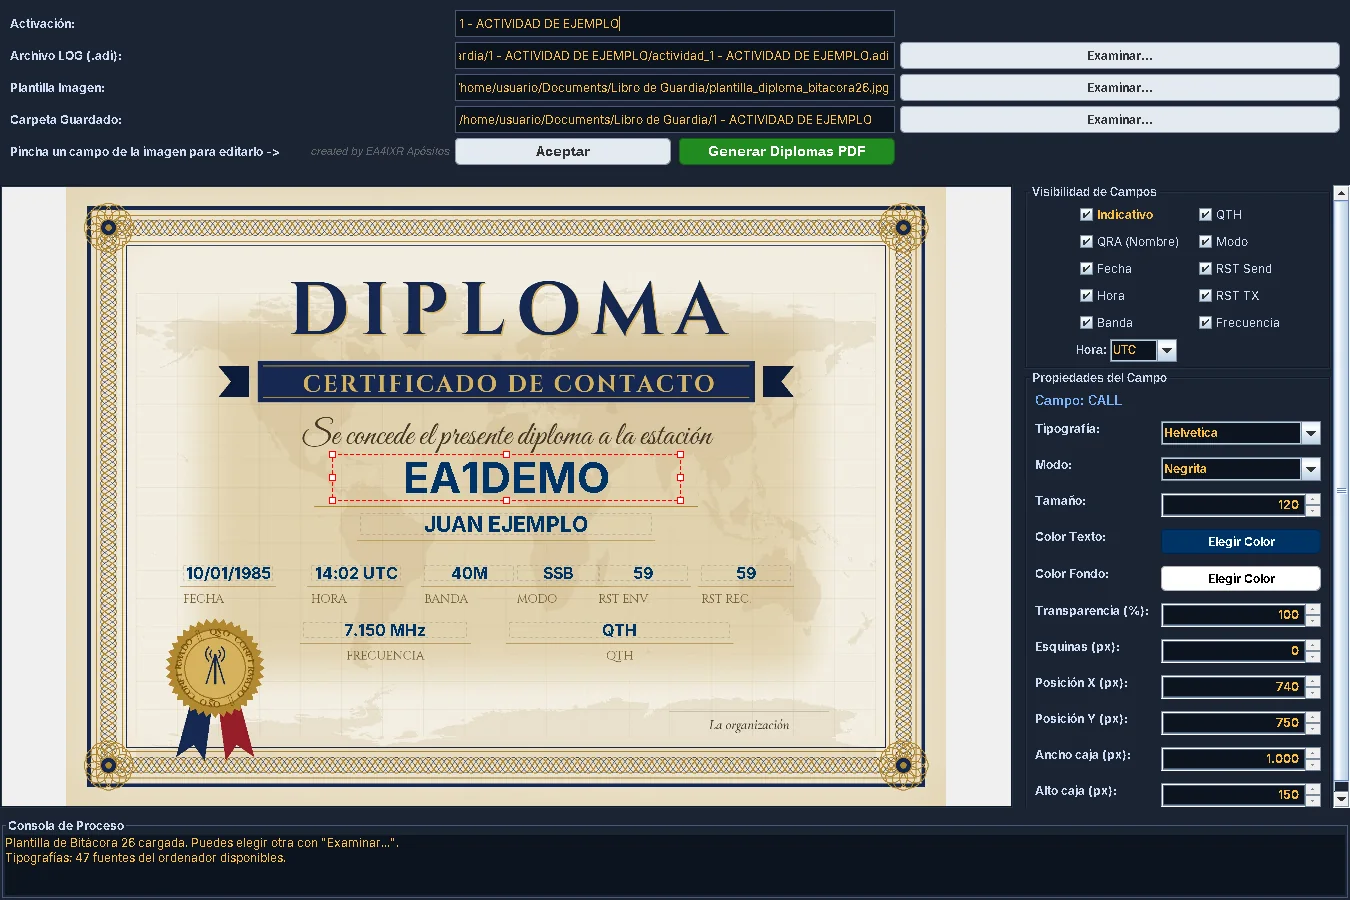
- With an activity selected the awards button appears: Configurar Diploma places the data on your template, with its own UTC / LOCAL selector, and Generar Diplomas PDF creates them all at once.
9. DIGITALES: FT8 and FT4
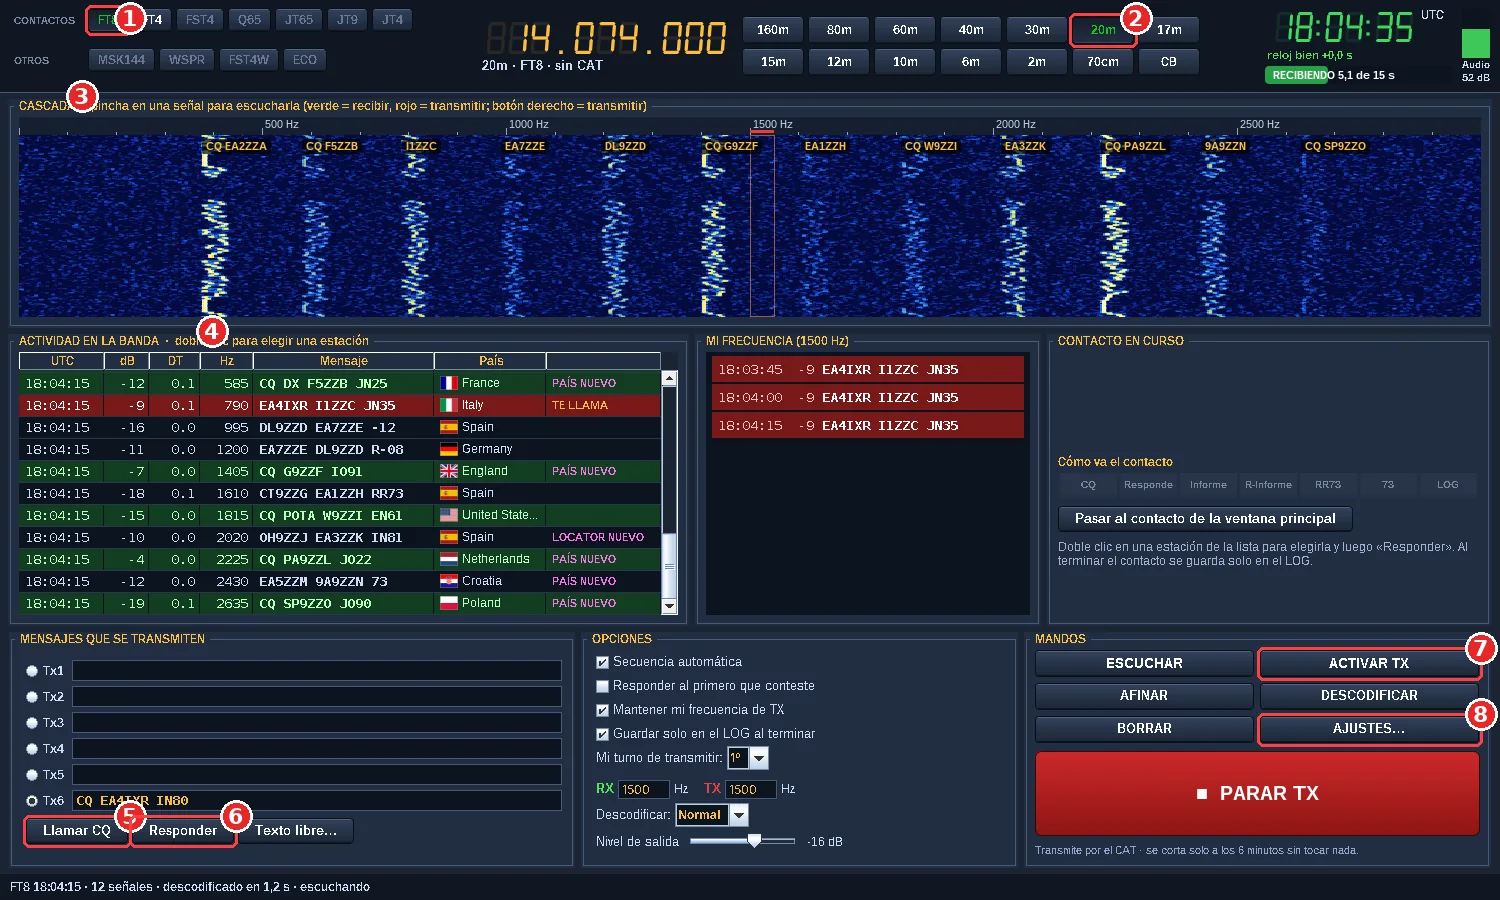
- 1Mode: FT8 or FT4.
- 2Band: with CAT, the radio goes to the FT8/FT4 frequency of that band. To the right, the green clock: click it to check the time.
- 3Waterfall: click = receive frequency (green); right-click = transmit frequency (red).
- 4Band activity: what is heard, with country and alerts (calling you, new country…). Double-click a station to select it.
- 5Llamar CQ (Call CQ).
- 6Responder (Answer) the selected station.
- 7ACTIVAR TX (Enable TX): allows transmitting. The big PARAR TX (Stop TX) button (or Esc) stops it.
- 8AJUSTES… (Settings): sound card, PTT and transmit mode.
What you need
- To receive: the radio's audio going into the computer (sound card or interface).
- To transmit: also the computer's audio output to the radio (audio interface or data cable) and a PTT method.
- The computer clock on time (less than 1 second off).
How to use it
- Mi frecuencia (My frequency) shows what arrives on your RX frequency.
- Double-click a station and Responder, or Llamar CQ. With Secuencia automática (automatic sequence) the contact moves on by itself and is saved to the LOG at the end.
- For safety it stops after 6 minutes without touching anything or after 5 CQs in a row, and does not transmit out of band, on CB, with the clock off or (with CAT PTT) without CAT.
- AFINAR (Tune) transmits a tone to set the level (30 s at most). Adjust the Nivel de salida (output level) so that ALC barely moves.
10. Bitácora 26 account
Free and optional. It is used for confirmations between users, QSL cards, filling in contacts from user details and the Cluster. Without an account, everything else works the same.
Create the account
- On the website: Create account. Or in the program: Mi Estación → Operador → Crear cuenta.
- You need: callsign (amateur radio and/or CB), full name, QTH, locator, email and password. Tick that you accept the terms of use.
- A code arrives by email: type it to activate the account.
Use it on another computer
On that computer: Mi Estación → Operador → Ya tengo cuenta (I already have an account), with your callsign, your password and another code sent by email. The account is not duplicated.
Who sees your data
Other users see your callsign, full name, QTH and locator inside the program when they log a contact with you and, if you press ON AIR, in the Cluster. Nobody sees your email. You can change your details, remove computers or delete the account in My account (website) or with Gestionar mi cuenta….
11. Confirmations and QSL
- Confirmations: if you both have an account and log the same contact (same band and mode, within ±30 minutes), it is confirmed automatically. You see it in the Confirmación column. QSL → Comprobar confirmaciones ahora checks right away.
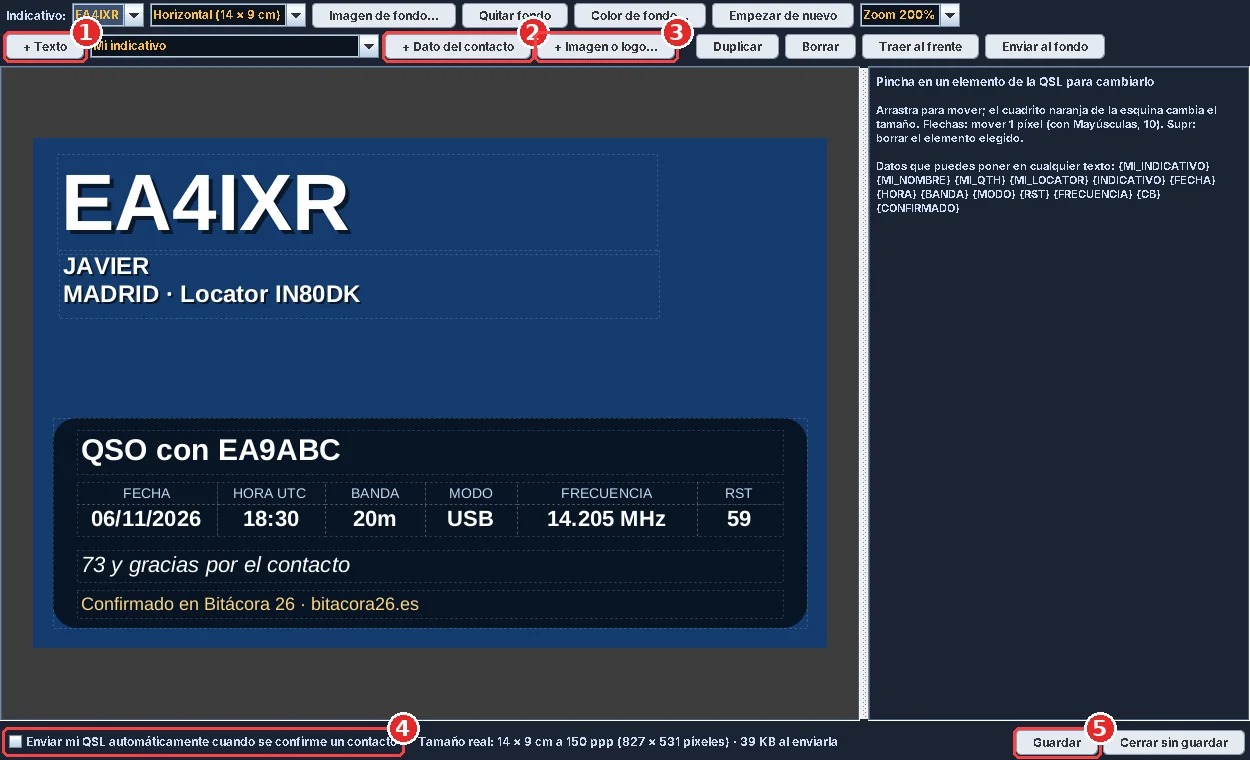
- Design my QSL: add texts, contact data and images, move them and resize them. Choose a background and format. Tick the box if you want it sent automatically.
- Send a QSL by hand: right-click the contact → Enviar mi QSL a… (Send my QSL to…). The other station needs an account.
- Received QSLs: QSL → QSL recibidas…; Abrir la carpeta QSL shows them on your computer.
12. Cluster and ON AIR (testing)
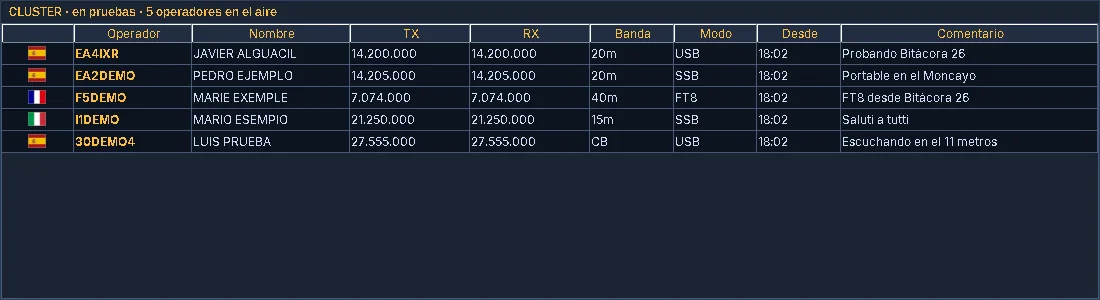
- You need the Bitácora 26 account with your callsign on this computer and to have accepted the terms of use.
- Press ON AIR on the display and write a comment if you like. Other users see your callsign, name, QTH, locator, frequency, band, mode, country and comment.
- Press ON AIR again, or close the program, and you no longer appear.
- Click a station in the Cluster to prepare the contact: the radio (with CAT), the waterfall and the form go to its frequency.
13. Online services
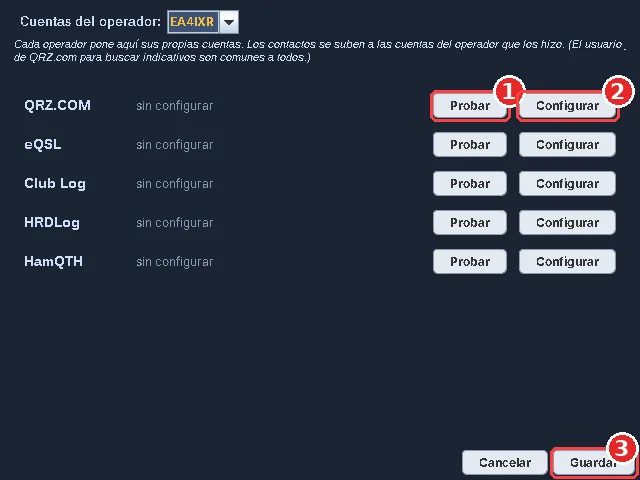
- Mi Estación → Servicios online. At the top, choose which operator the accounts belong to.
- For each service (QRZ.COM, eQSL, Club Log, HRDLog, HamQTH) click Configurar and type your details. Tick Subir cada contacto (Upload each contact) if you want them uploaded automatically.
- Click Probar to check they work (nothing is uploaded) and then Guardar.
- QRZ.com: username and password are used to look up callsigns; the API Key (QRZ.com → Logbook → Settings) to upload contacts, which QRZ.com only accepts with a paid subscription.
- HRDLog: use the upload code from your profile, not your password.
- To upload a single contact: right-click → Subir a los servicios online.
14. Sync, import and export
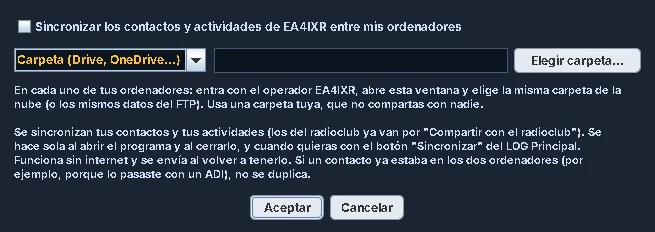
- Sync between your computers: in Mi Estación → Operador → Sincronizar mis ordenadores… choose a cloud folder (Google Drive, OneDrive…) or an FTP server. Then it syncs by itself when opening and closing the program, or whenever you like with Archivo → Sincronizar Contactos.
- Radio club: Archivo → Sincronizar Contactos del Radioclub sends what is new and collects the other members' contacts.
- Import: Archivo → Importar an .adi file, into an operator's log or as a new activity. Each contact's operator is kept.
- Export: Archivo → Exportar to .adi, everything or by operator and bands. Time is always in UTC.
15. Radio club
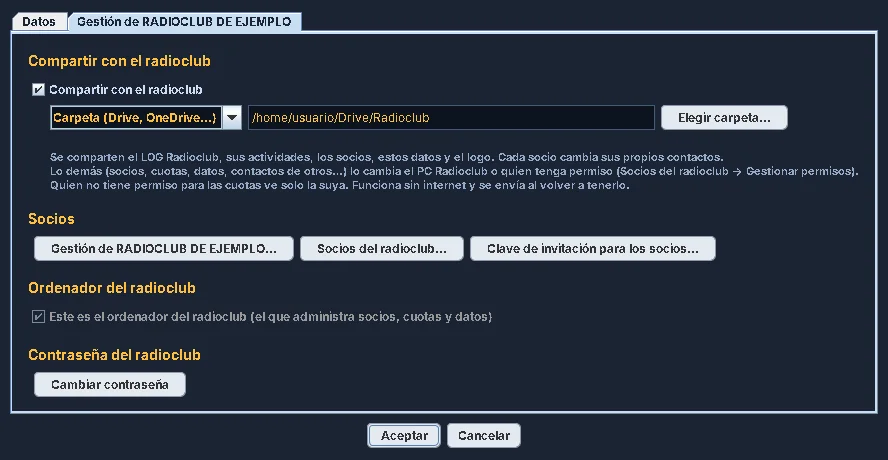
- Mi Estación → Radioclub: name, callsigns (CB, HF and special), logo and how the radio club LOG is shared (cloud folder or FTP).
- Hacer este el ordenador del radioclub… makes it the radio club PC, which is in charge of the others.
- Socios del radioclub… (Radio club members): new members, roles (Super Admin, Admin, Member), fees per year and list export. Gestionar permisos… sets what each role can do.
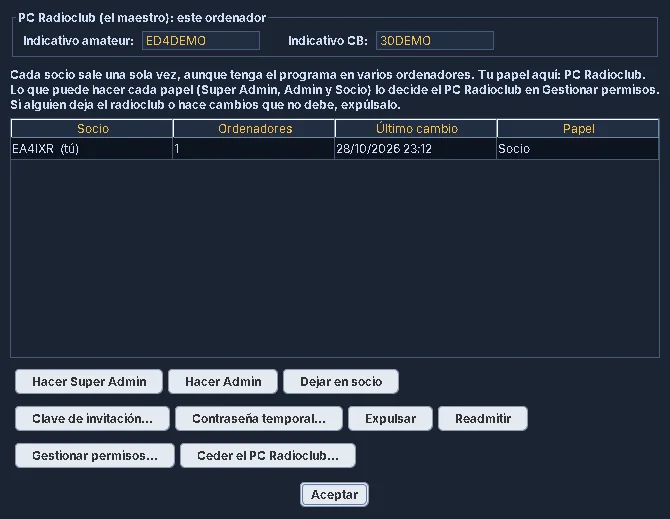
- Clave de invitación… creates each member's key; the member pastes it with Tengo clave del radioclub… and joins automatically.
- In the activity selector, LOG Radioclub shows all members' contacts, with each operator.
16. Your data, backups and updates
- Your contacts and settings are on your computer, in Documents\Libro de Guardia. Back up that folder from time to time.
- When it opens, the program checks for a new version and, if you want, updates itself without losing anything. Also in Ayuda → Información de la aplicación → Buscar actualizaciones.
- Questions or bugs? Write to info@bitacora26.es.
Home · Legal notice · Privacy · Cookies · Terms of use